
Day 4 - How to build your own team chat in five days - ExpressJS, Socket.io and AngularJS component-based design patterns
This is part 4 of an ongoing series of blog posts. Read part 1 first and then come back, please!
Welcome back to day 4 of "How to build your own team chat in five days"! I haven't had the time to introduce you properly to the first "real" iteration of "chitchat", yesterday.
First of all, the complete sourcecode can be found in the github repository.
And here's again the directory structure:
├── public
│   ├── app
│   ├── images
│   ├── jspm_packages
│   ├── config.js
│   ├── styles
│   └── index.html
└── styles
    ├── base
    ├── layout
    ├── modules
    └── application.scss
├── node_modules
├── package.json
├── gulpfile.js
├── app.js
└── README.md
Let's dive into the sourcecode starting with the ExpressJS part.
ExpressJS server side #
If you already have experience in ExpressJS the following configuration and setup code in app.js should not surprise you:
var express        = require('express');
var bodyParser     = require('body-parser');
var logger         = require('morgan');
var methodOverride = require('method-override');
var multer         = require('multer');
var path           = require('path');

var app            = express();
var http           = require('http').createServer(app);

app.set('port', process.env.PORT || 3000);

app.use(logger('dev'));
app.use(methodOverride());
app.use(bodyParser.json());
app.use(bodyParser.urlencoded({ extended: true }));
app.use(multer());
app.use(express.static(path.join(__dirname, 'public')));

// development only
if ('development' == app.get('env')) {
  app.use(express.errorHandler({ dumpExceptions: true, showStack: true }));
}

// some code omitted here

http.listen(app.get('port'), function() {
  console.log('Express server listening on port ' + app.get('port'));
});
This is a default setup for an ExpressJS server which serves static files from public/. Additionally, I've required the modules body-parser and method-override in order to handle JSON requests. So, this is a good basis to implement some routes for a JSON REST API or similar.
But, since we are going to look into the real-time part of messaging today, let's see how to integrate Socket.io here first.
A simple chat using Socket.io #
In order to make Socket.io work with ExpressJS we first have to initialize it:
// first the setup of ExpressJS itself
var app            = express();
var http           = require('http').createServer(app);

// now socket.io
var io = require('socket.io').listen(http);

// and then we can start the server
http.listen(app.get('port'), function() {
  console.log('Express server listening on port ' + app.get('port'));
});
If you now start your server with node app.js, or npm start since that's configured in package.json, you are now ready to initiate a websocket connection.
The Socket.io server goes one step further and also delivers the client library to integrate with. You can actually request it via the following URL localhost:3000/socket.io/socket.io.js and you can find me do the same in the public/index.html head via:
<script src="/socket.io/socket.io.js"></script>After all the setup work is done we can finally initiate a Websocket connection with our client. I've put all the Socket.io code into public/app/web_socket.js, let's have a look together:
export default class WebSocket {

  constructor() {
    this.init();
  }

  init() {
    let host = window.location.origin;
    console.log("WEBSOCKET connecting to", host);

    this.socket = io.connect(host);

    this.socket.on('connect', () => {
      let sessionId = this.socket.io.engine.id;

      console.log("WEBSOCKET connected with session id", sessionId);

      this.socket.emit('new_user', { id: sessionId });
    })
  }
}

WebSocket.$inject = [];
First we need the url to connect to via Websocket and window.location.origin returns http://localhost:3000 for us. Perfect!
Next is the actual connect via io.connect(host) and then we implement our first callback. Socket.io emits a connect event when the connection handshake was successful. And we use it and retrieve our sessionID from it. That is basically as good as it gets for our user in the current prototype.
The WebSocket class calls init() in the constructor in order to connect when initializing the class and I'm making sure there's only a since instance by using it as an Angular service.
That's why in main.js it is integrated in the following way:
import WebSocket from './web_socket';

angular.module('mainApp', [
    // dependencies omitted
  ]).service(WebSocket.name, WebSocket);
One last thing here to mention is that I emit a new_user event with the sessionID since I want to notify all interested parties that a new participant joined the chat.
Let's go back to app.js on the server side to see how the connection handshake and new_user event is handled:
// [
//  { session_id: "5W5f-HSzolBOjMj7AAAC", name: "Peter" },
//  { session_id: "YXlbm_LmHD7oUGwkAAAD", name: "Martin"}
// ]
var participants = [];
var nameCounter  = 1;

io.on("connection", function(socket) {

  socket.on("new_user", function(data) {

    var newName = "Guest " + nameCounter++;
    participants.push({ id: data.id, name: newName });

    io.sockets.emit("new_connection", {
      user: {
        id: data.id,
        name: newName
      },
      sender:"system",
      created_at: new Date().toISOString(),
      participants: participants
    });
  });
});
First of all we have the connection event I'm listening here, which gets triggered whenever a new client is connected to the server. Then the server registered for the new_user event which we saw on the client-side above. And I basically create a dumb Guest <number> user name, add it to the array of participants alongside the user id and then emit another event new_connection which is send to inform all parties that the participants changed.
Wouldn't it be cool if we would have some kind of currentUser on the client? Note that the new_connection payload also contains the user id and name alongside the participants array. We can use this event on the client side to set our current user including all the information (in our case name only) we gathered on the server.
So, let's go back to web_socket.js on the client:
import Auth from "./auth";

export default class WebSocket {

  constructor($rootScope) {
    this.$rootScope = $rootScope;
    this.init();
  }

  init() {
    // code omitted

    this.socket.on('connect', () => {
      let sessionId = this.socket.io.engine.id;

      // code ommited

      // this is the new event handler
      this.socket.on('new_connection', (data) => {

        if (data.user.id === sessionId) {
          this.$rootScope.$apply(() => {
            Auth.setCurrentUser(data.user);
          });
        }
      });
    });
  }
}

WebSocket.$inject = ['$rootScope'];
I've changed a few things but let's first focus on the new_connection event handler. It compares the user id which was send from the server with the sessionId and if they match we set the current user using the Auth class.
The Auth class is pretty simple:
export default class Auth {

  static setCurrentUser(user) {
    this.currentUser = user;
  }

  static getCurrentUser() {
    return this.currentUser;
  }
}
It contains a function for setting and getting the current user, but note that the methods are both static so we can access them using Auth.getCurrentUser() instead of creating an instance of Auth. I've could have used another Angular service in this case but I'd like to look into native ES6 ways of structuring my code first.
The attentive reader has already spotted one Angular-specific part in our WebSocket class. I'm wrapping the Auth.setCurrentUser call in a $rootScope.$apply to let Angular know that I've changed something which it might have access to on the scope. For example when rendering the current user name in our HTML document the change would not get reflected without this $apply call. BTW, this is a problem which will be gone in AngularJS 2.0 and I'm very much looking forward to it!
There's one more function in our WebSocket class I'd like you to check out:
export default class WebSocket {

  // details omitted here

  on(key, callback) {
    this.socket.on(key, (data) => {
      this.$rootScope.$apply(() => {
        callback(data)
      });
    });
  }
}
This on function let's other components in my code base register for events emitted by the server. It will come in handy when rendering the list of participants for example. Which brings me to the AngularJS side of the prototype.
AngularJS using a component-oriented approach #
Let's starts with the directory structure of the AngularJS app inside the public/ directory:
├── app
│ ├── message_form
│ ├── message_list
│ ├── participants_list
│ ├── sidebar
│ ├── auth.js
│ ├── bootstrap.js
│ ├── main.js
│ ├── vendor.js
│ └── web_socket.js
├── jspm_packages
├── styles
├── images
├── config.js
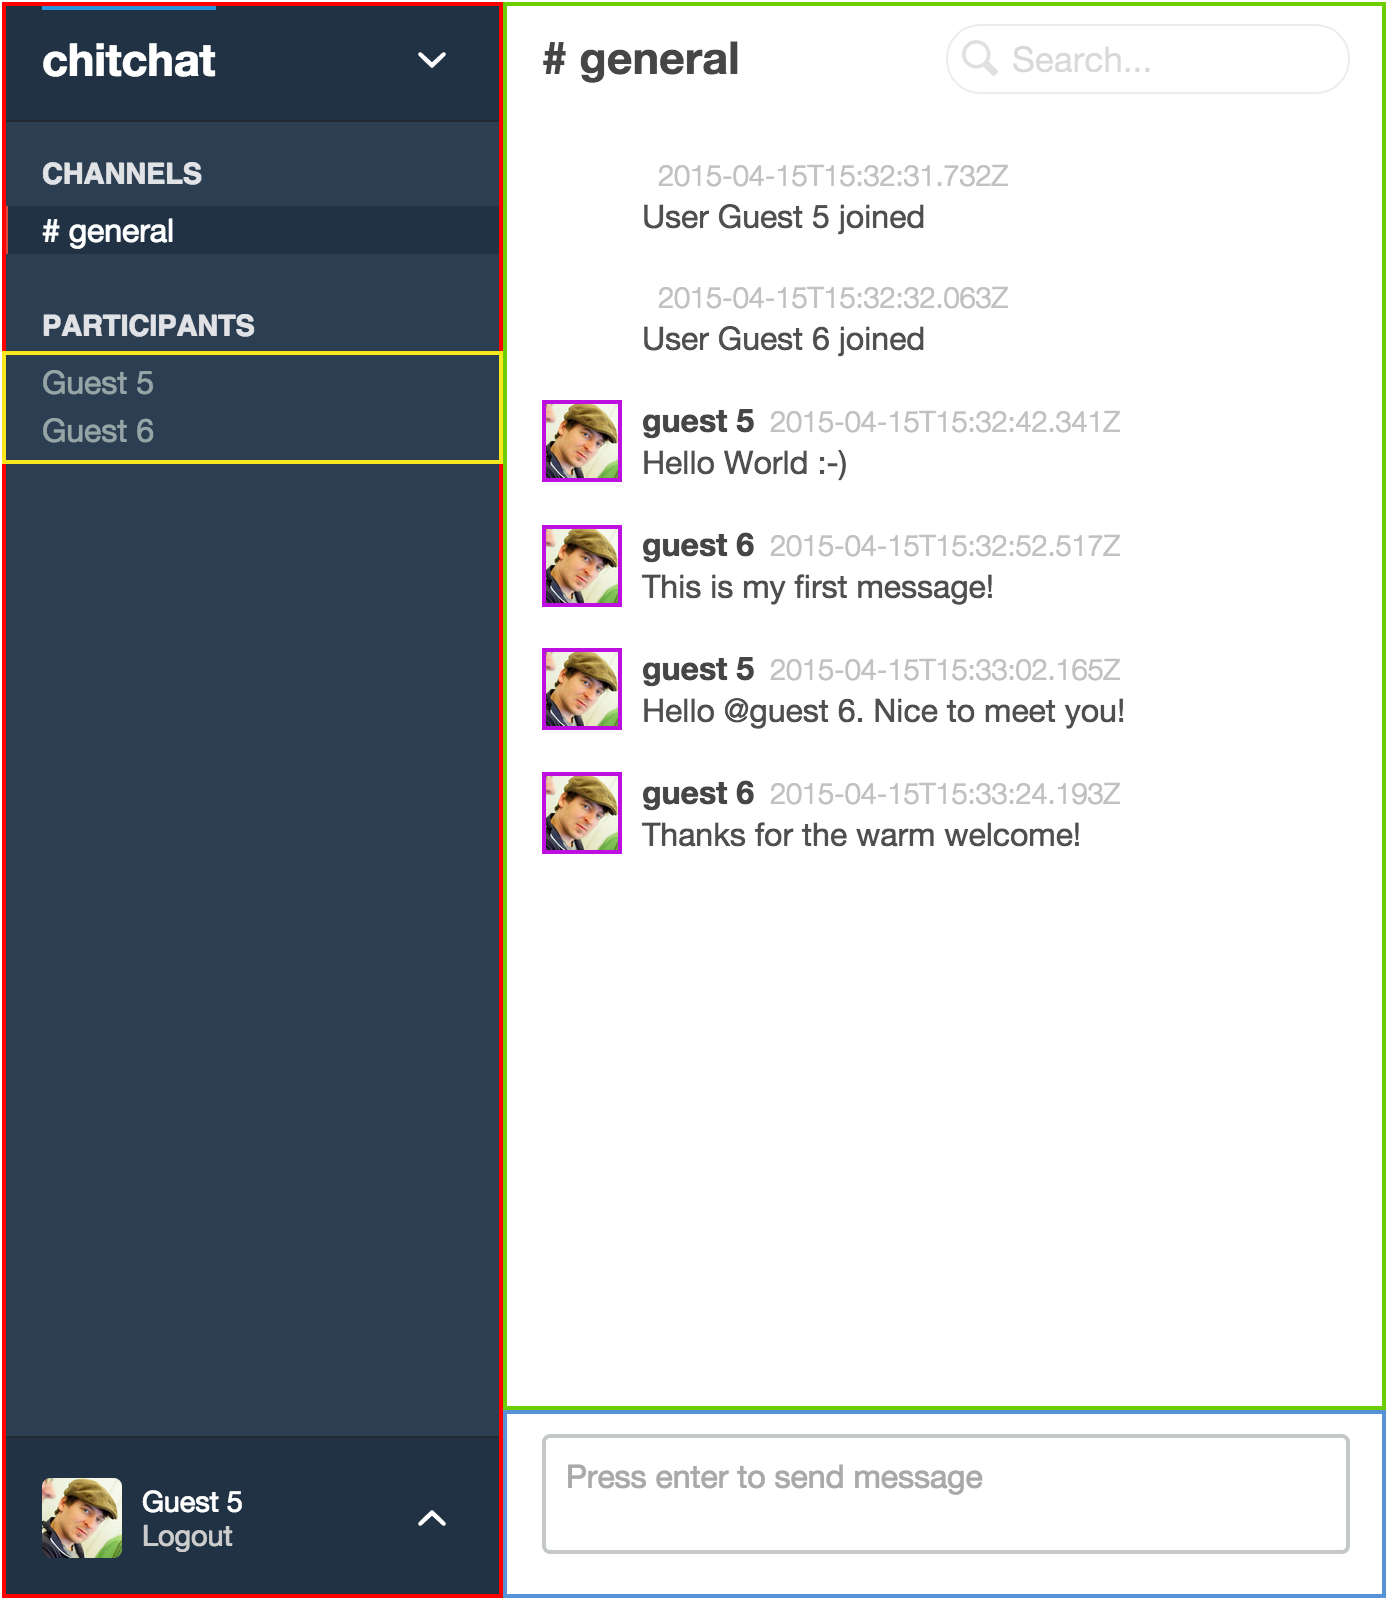
├── index.htmlYou already know main.js, bootstrap.js and most other files from the previous days. And we've already talked about auth.js and web_socket.js. So, let's focus now on the way I've structured the AngularJS components in index.html:
<body>
  <sidebar></sidebar>

  <div class="main-content">

    <div class="main-header">
      <div class="left">
        <h2># general</h2>
      </div>
      <div class="right">
        <input class="search" type="search" placeholder="Search...">
      </div>
    </div>

    <message-list></message-list>
    <message-form></message-form>
  </div>
</body>
You can see that I've introduced new HTML elements for the sidebar, message-list and message-form using Angular directives. And some of these components contain again child components. This can be easily visualized too:
Components and nested components
That way the structure of my code follows very closely the actual visual structure of the dom elements. Here's the directory structure of these components:
├── message_form
│   ├── message_form.controller.js
│   ├── message_form.directive.js
│   ├── message_form.html
│   ├── message_form.module.js
│   └── submit_form_on_return.directive.js
├── message_list
│   ├── message_list.controller.js
│   ├── message_list.directive.js
│   ├── message_list.html
│   └── message_list.module.js
├── participants_list
│   ├── participants_list.controller.js
│   ├── participants_list.directive.js
│   ├── participants_list.html
│   └── participants_list.module.js
├── sidebar
│   ├── sidebar.controller.js
│   ├── sidebar.directive.js
│   ├── sidebar.html
│   └── sidebar.module.js
├── auth.js
├── bootstrap.js
├── main.js
├── vendor.js
└── web_socket.js
The all look pretty much the same. I use a directory for each component and each component contains an Angular module and a directive which itself encapsulates the controller and the template.
Let's have a look at some of these components next, starting with the message-form component.
Message Form Component #
The message form component is responsible for rendering a textarea where the user can post new messages. Additionally, it also handles the server communication to create the message on the server.

Message form component
We start again with the visual aspects of the message_form.html:
<div class="message-form">
  <form ng-submit="ctrl.sendMessage(ctrl.message)" submit-form-on-return>
    <textarea ng-model="ctrl.message" placeholder="Press enter to send message" autofocus/>
  </form>
</div>
It contains a form with an ng-submit directive and a textarea with an ng-model. Nothing fancy here, except that I used a what I call a behaviour directive in comparison to the component directives which you have seen visualized above already. The directive submits the form when pressing the enter or return button on your keyboard.
Now you might have noticed that I use ctrl in the ng-submit and ng-model directives, as for example ctrl.message. So, let's have a look at the directive implementation and more specifically how the scope is set up:
import template from "./message_form.html!text";
import MessageFormController from "./message_form.controller";

function messageFormDirective() {
  return {
    restrict: "E",
    replace: true,
    scope: {},
    template: template,
    bindToController: true,
    controllerAs: "ctrl",
    controller: MessageFormController
  };
}

messageFormDirective.$inject = [];

export default messageFormDirective;
Focusing on the scope specific parts here, I've started with creating an isolated scope with scope and the scope is bound to the controller using bindToController as ctrl using the controllerAs property.
Now all these properties are way to complicated and there's a lot of duplication in my code, but with Angular 1.4 (Angular bindToController git commit) there's most probably going to be a new syntax bindToController which combines all these properties into a single property - perfect for my component directives! And another nice step towards an easy migration path to Angular 2.0!
Using the ctrl inside the template makes sense but of course in the controller itself we just use the controller's this syntax:
import Auth from "../auth";

class MessageFormController {

  constructor($http) {
    this.$http = $http;
  }

  sendMessage(message) {
    let params = {
      message:    message,
      created_at: new Date().toISOString(),
      user_id:    Auth.getCurrentUser().id
    };

    this.$http.post("/messages", params).then(
      () => {
        this.message = "";
      },
      (reason) => {
        console.log("error", reason);
      }
    );
  }

}

MessageFormController.$inject = ["$http"];

export default MessageFormController;
The sendMessage function is what's called in the template and is responsible for doing an AJAX POST request to the /messages route. The JSON payload (default format in Angular's $http service) contains the actual message, the current user id and the current date.
On the server side in app.js I've defined a route for this messages/ endpoint:
app.post("/messages", function(request, response) {
  var message = request.body.message;

  if(message && message.trim().length > 0) {
    var user_id    = request.body.user_id;
    var created_at = request.body.created_at;
    var user       = _.findWhere(participants, { id: user_id });

    // let our chatroom know there was a new message
    io.sockets.emit("incoming_message", { message: message, user: user, created_at: created_at });

    response.json(200, { message: "Message received" });
  } else {
    return response.json(400, { error: "Invalid message" });
  }
})
After checking if the request payload contains a message we extract the user and the created_at and emit an event incoming_message to let all other participants receive this message via Socket.io. Now, the logical next step here would be to add a persistence layer and actually store the message, but not for this current state of the prototype.
We want to focus next on the message list component which listens for this incoming_message event.
Message list component #
The message list component renders a list of messages and handles the incoming_message event.
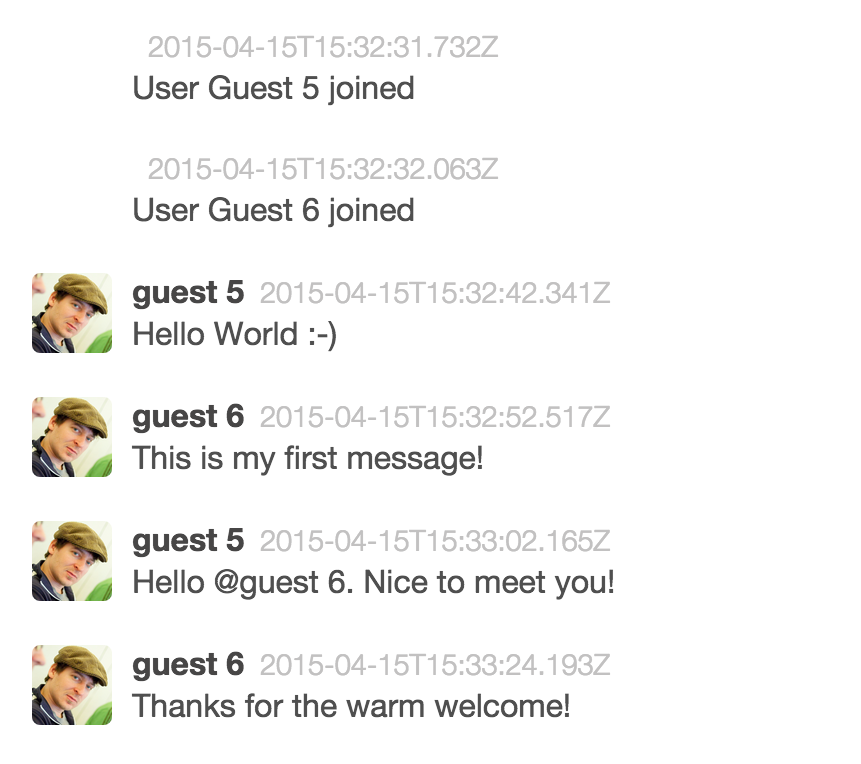
Message list component
Let's start again with the template:
<div class="message-list">
  <div ng-repeat="messageContent in ctrl.messages" class="message-item {{messageContent.type}}">
    <img src="images/profile.jpg" class="avatar" ng-if="messageContent.type == 'message'">
    <div class="message-container">
      <div class="meta">
        <span class="author">{{messageContent.user.name}}</span> <span class="date">{{messageContent.created_at}}</span>
      </div>
      <div class="message">
        {{messageContent.message}}
      </div>
    </div>
  </div>
</div>
The message list uses the ng-repeat directive to render a list of messaging. Note, that I've introduced two types of messages. The type message is used for a user generated message, the type notification for a system generated message, for example: "User Guest 1 joined", etc. Nothing fancy here, let's skip the setup of the directive too, because it's so similar to the other directives and focus instead on the controller:
class MessageListController {

  constructor(WebSocket) {
    this.messages = [];

    this.WebSocket = WebSocket;

    this.register();
  }

  register() {
    this.WebSocket.on('incoming_message', (data) => {
      this.handleIncomingMessage(data);
    });

    this.WebSocket.on('new_connection', (data) => {
      this.handleNewConnection(data);
    });

    this.WebSocket.on('user_disconnected', (data) => {
      this.handleUserDisconnected(data);
    });
  }

  handleIncomingMessage(data) {
    this.messages.push({ message: data.message, user: data.user, created_at: data.created_at, type: "message" });
  }

  handleUserDisconnected(data) {
    this.messages.push({ message: `User ${data.user.name} disconnected`, name: "System", created_at: data.created_at, type: "notification" });
  }

  handleNewConnection(data) {
    this.messages.push({ message: `User ${data.user.name} joined`, name: "System", created_at: data.created_at, type: "notification" });
  }

}

MessageListController.$inject = ["WebSocket"];

export default MessageListController;
The controller is starting with an empty array of messages and registers a whole lot of listeners for various events. The incoming_message event we discussed above already will simply add the user generated message to messages array. The other events new_connection and user_disconned will add system notification to the message list.
Now one could argue why this complexity on the client side and in fact I might decide for a future iteration to move all this to the server which then handles the various events and emits a single new_message. We'll see how this works out for this week!
There are two more components namely the sidebar and the participants-list, but they are in fact pretty similar to what you've seen here already so I'm not going to go into further explaining them here.
That's it for today! I'm going to get back to coding. So, stay tuned for tomorrow where I hopefully have the time to add some more polish to the frontend!
The complete sourcecode can be found in the github repository.
This is part 4 of an ongoing series of blog posts. Continue reading part 5.