
Day 5 - How to build your own team chat in five days - Angular Filters and Directives
This is part 5 of an ongoing series of blog posts. Read part 1 first and then come back, please!
Welcome back to day 5 of "How to build your own team chat in five days"! Since yesterday has been quite an extensive Socket.IO day where we switched back and forth between client and server, I figured it would be nice for the final day to work on the client only. I'd like to therefore focus today on adding some final touches to "chitchat".
Relative date time Angular filter using moment.js #
Let's start with a simple Angular filter to render the message creation timestamp as a user-friendly relative time instead, for example "7 minutes ago".
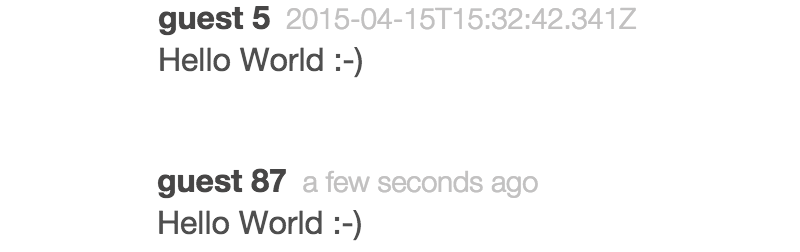
From timestamp to user-friendly relative time
The Angular filter relativeDate is used via a | (pipe) character:
<span class="date">{{messageContent.created_at | relativeDate }}</span>
And here's the code leveraging moment.js for the actual conversion:
import moment from "moment";

export default function relativeDateFilter() {
  return function(dateString) {
    return moment(dateString).fromNow();
  };
}
Now how did I get moment.js installed? I've used the jspm install moment command and then it was only a matter of importing the library inside the filter.
Don't forget that the relativeDate filter needs to be registered using the message-list module:
export default angular.module('MessageList', [])
  .filter('relativeDate', relativeDateFilter);
Rendering an avatar with an Angular directive #
Instead of my own avatar image I wanted to use something which always works just based on the name of the user without the user uploading an image. The easiest solution I came up with is using the initials.
Rendering the avatar with its initials
This time I'm using an component directive again, which can be used in the message_list.html template like that:
<avatar user="messageContent.user"/>The directive's template itself looks pretty straight-forward:
<div class="avatar" style="background-color: {{color}}">
  <span class="initials">{{initials}}</span>
</div>
We need our directive to provide the initials and a background color to work with.
import template from "./avatar.html!text";

function avatarDirective() {
  let colorMapping = {};

  return {
    restrict: "E",
    replace: true,
    scope: {
      user: "="
    },
    template: template,
    link: function($scope) {

      // http://stackoverflow.com/questions/1484506/random-color-generator-in-javascript
      function randomColor() {
        var letters = '0123456789ABCDEF'.split('');
        var color = '#';
        for (var i = 0; i < 6; i++ ) {
            color += letters[Math.floor(Math.random() * 16)];
        }
        return color;
      }

      var unwatch = $scope.$watch("user", function(user) {
        if (user) {
          $scope.initials = (user.name[0] || "A");

          if (!colorMapping[user.id]) colorMapping[user.id] = randomColor();
          $scope.color    = colorMapping[user.id];

          unwatch();
        }
      });
    }
  };
}

avatarDirective.$inject = [];

export default avatarDirective;
The directive's scope configuration is very similar to our other component directives. Let's focus on the user which is passed as attribute to the directive.
I've setup a watcher using $scope.$watch to make sure that the user is set and resolved correctly. Then I use the first character of the name and a pretty random color generator for the color. Note, that I memorize the color for the specific user id in colorMapping, since we want it to stay the same at all times.
Dont' forgot to register the directive to make it usable for Angular compiled templates! Let's have another look at the message list next.
Formatting and auto linking the message #
If you played around and wrote a couple of messages you notice that it doesn't handle line breaks correctly. Additionally, it would be awesome if the message would automatically create links out of URLs in the message body.
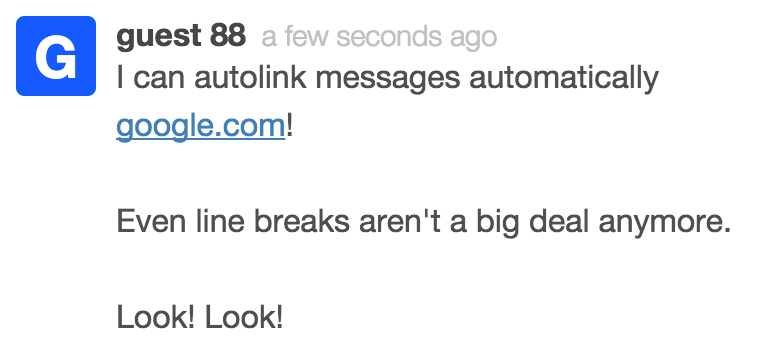
Autolinking and line breaks
This is again a job for an Angular directive. Let's have a look how it would be used in the message_list.html template:
<div class="message" formatted-message="messageContent.message"/>
The idea is that you pass in a string and it will set the text of the HTML element for you nicely formatted. Let's have a look at the directives code:
import FormatMessageService from "./format_message.service";

function formattedMessage() {
  return {
    restrict: "A",
    scope: {
      "formattedMessage" : "="
    },
    link: function($scope, element, attrs) {
      var unwatch = $scope.$watch("formattedMessage", function(str) {
        if (str) {
          str = FormatMessageService.breakNewLine(str);
          str = FormatMessageService.autoLink(str);
          element.html(str);

          unwatch();
        }
      });
    }
  };
}

formattedMessage.$inject = [];

export default formattedMessage;
The directive is a behaviour directive and not a component directive. That's way it's usage is restricted to HTML attributes. We pass in the message string in the context and use an Angular watcher again to check if the message is resolved correctly before starting to change it.
Then we use a new service FormatMessageService to do the actual hard work. Before we go into further details, note that I'm calling the unwatch() function - the return value of the $watch call - to stop watching. Otherwise, it would reformat the message on each digest. Since we don't intend to change the message, we can skip this here.
The FormatMessageService look the following:
import Autolinker from "autolinker";

export default class FormatMessageService {

  static breakNewLine(str) {
    return str.replace(/(\r|\n)/g, '<br>');
  }

  static autoLink(str) {
    return Autolinker.link(str, {
      newWindow: true,
      className: "auto-link",
      twitter: false,
      hashtag: false
    });
  }

}
It uses a simple string replace to replace \r and \n with a <br> element. The auto linking is a bit more complicated and since I didn't want to make you suffer with a horrible piece of regular expression, I've used the library Autolinker.js
I didn't want to make you suffer with a horrible piece of regular expression.
Again the library was just an easy jspm install npm:autolink away and then I was able to import it in my service.
One last directive I'd like to discuss with you is trying to solve the scrolling behaviour.
Making sure the message scrolls to the bottom #
You might have noticed that the message list scroll position stays the same even when you create or receive new messages. That's quite annoying and users expect for their newly written messages to be visible right away.
Let's look into how this can be achived with a directive. How about we simple extend the existing message list directive:
function messageListDirective() {
  return {
    // omitted directive configuration
    link: function($scope, element) {

      function scrollToBottom() {
        element.scrollTop(element.prop("scrollHeight"));
      }

      var observer = new window.MutationObserver(scrollToBottom);
      observer.observe(element[0], { childList: true });

      $scope.$on("$destroy", () => {
        observer.disconnect();
      });
    }
  };
}
We want to achieve a scroll effect to the bottom of the message list whenever a new message is added to the list. Fortunately, there's a MutationObserver available in most browsers which let you register a callback in case the children of our list are added or removed.
The observer is initialized with the scrollToBottom function which sets the scroll position to the height of the scrollable view area.
Note, that I unregister the observer using the disconnect function when the scope is destroyed. We dont' want to have any memory leaks in our app!
Now there's one problem with the code. We don't want to always scroll to the bottom of the message list. What if the user scrolled all the way up to some older messages. A new incoming message would scroll him/her down to the bottom of the list again - that would be certainly annoying!
var alreadyAtBottom = true;

function scrollToBottom() {
  if (alreadyAtBottom) {
    element.scrollTop(element.prop("scrollHeight"));
  }
}

function isAtBottom() {
  var scrollTop = element.scrollTop();
  var maxHeight = element.prop("scrollHeight") - element.prop("clientHeight");

  return scrollTop >= maxHeight;
}

// https://developer.mozilla.org/en/docs/Web/API/MutationObserver
var observer = new window.MutationObserver(scrollToBottom);

observer.observe(element[0], { childList: true });

var throttledOnScrollHandler = _.throttle(function() {
  alreadyAtBottom = isAtBottom();
}, 250);

element.on("scroll", throttledOnScrollHandler);

$scope.$on("$destroy", () => {
  element.off("scroll", throttledOnScrollHandler);
  observer.disconnect();
});
The idea how to solve this is pretty simple. I registered an event handler in case the user is scrolling and set the alreadyAtBottom to true if the user is actually at the bottom of the list already. Only then should the MutationObserver behaviour kick in.
The isAtBottom function checks the current scroll position, with the maximum height of the scollable area to check if the user is at the bottom. We can then use this information in the scrollToBottom function to decide if we want to scroll to the bottom.
Again note, that I unbind the scroll event again in order to not create any memory leaks. Additionally, I've used underscore.js throttle method for the scroll handler since we don't want to waste precious CPU cycle when the user starts scrolling quickly.
Since all the code for the scroll to bottom behaviour is not dependend on any properties of the message list directive, it would probably be a good idea to refactor it out into it's own directive. That way we can reuse it easily elsewhere.
Final words #
Look at what we accomplished in only five days!

Final version
That's already it for the final day. I really hope you enjoyed this series. I certainly had a lot of fun :-) Now it's your turn to get your hands dirty and start experimenting with your own team chat!

About time you get your hands dirty and start experimenting with your own team chat!
If you want to learn more about structuring your Angular apps, let me know in the comments! Who knows - I might even consider turning this blog series into a little ebook! There are still so many things left to discuss!
The complete sourcecode can be found in the github repository.